我们在进行Android的ndk开发时,由于C代码不好调试,我们往往采用日志记录的方式进行跟踪调试代码,比较麻烦,而且一旦C代码crash,很难直接定位到哪里出了问题。这里作者分享一个开源工程【 google-breakpad 】的使用,希望能对大家的C代码调试增加一点思路。
CONTENTS
备注:
1)由于google-breakpad的分析对平台有兼容性要求,作者在ubuntu13.10 x64上进行google-breakpad的学习。
2)后续源代码工程放到github上面。
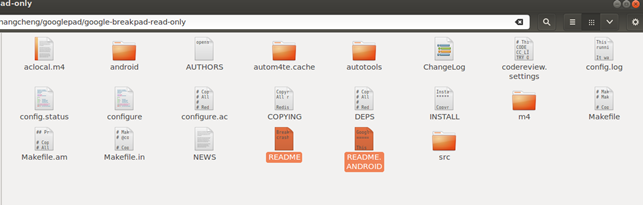
google-breakpad的下载
我们可以直接访问官方网站【 https://code.google.com/p/google-breakpad/source/checkout 】来下载代码,很简单,直接用命令行checkout即可。
svn checkout http://google-breakpad.googlecode.com/svn/trunk/ google-breakpad-read-only
如下图:

下载完成后进入下载的目录,可以发现里面有几个介绍文件,如下图,非常重要,我们就按照这个来一步一步的整合。
这里我把【 README.ANDROID 】文件贴出来,我们后续的学习都是根据这个文件的介绍一步步来的。
README.ANDROID:
Google Breakpad for Android
===========================

This document explains how to use the Google Breakpad client library
on Android, and later generate valid stack traces from the minidumps
it generates.

This release supports ARM, x86 and MIPS based Android systems.

I. Building the client library:
===============================

The Android client is built as a static library that you can
link into your own Android native code. There are two ways to
build it:

I.1. Building with ndk-build:
-----------------------------

If you're using the ndk-build build system, you can follow
these simple steps:

  1/ Include android/google_breakpad/Android.mk from your own
     project's Android.mk

     This can be done either directly, or using ndk-build's
     import-module feature.

  2/ Link the library to one of your modules by using:

     LOCAL_STATIC_LIBRARIES += breakpad_client

NOTE: The client library requires a C++ STL implementation,
      which you can select with APP_STL in your Application.mk

      It has been tested succesfully with both STLport and GNU libstdc++


II.1. Building with a standalone Android toolchain:
---------------------------------------------------

All you need to do is configure your build with the right 'host'
value, and disable the processor and tools, as in:

  $GOOGLE_BREAKPAD_PATH/configure --host=arm-linux-androideabi \
                                  --disable-processor \
                                  --disable-tools
  make -j4

The library will be under src/client/linux/libbreakpad_client.a

You can also use 'make check' to run the test suite on a connected
Android device. This requires the Android 'adb' tool to be in your
path.

II. Using the client library in Android:
========================================

The usage instructions are very similar to the Linux ones that are
found at http://code.google.com/p/google-breakpad/wiki/LinuxStarterGuide

1/ You need to include "client/linux/handler/exception_handler.h" from a C++
   source file.

2/ If you're not using ndk-build, you also need to:

   - add the following to your compiler include search paths:
       $GOOGLE_BREAKPAD_PATH/src
       $GOOGLE_BREAKPAD_PATH/src/common/android/include

   - add -llog to your linker flags

   Note that ndk-build does that for your automatically.

3/ Keep in mind that there is no /tmp directory on Android.

   If you use the library from a regular Android applications, specify a
   path under your app-specific storage directory. An alternative is to
   store them on the SDCard, but this requires a specific permission.

For a concrete example, see the sample test application under
android/sample_app. See its README for more information.


III. Getting a stack trace on the host:
=======================================

This process is similar to other platforms, but here's a quick example:

1/ Retrieve the minidumps on your development machine.

2/ Dump the symbols for your native libraries with the 'dump_syms' tool.
   This first requires building the host version of Google Breakpad, then
   calling:

      dump_syms $PROJECT_PATH/obj/local/$ABI/libfoo.so > libfoo.so.sym

3/ Create the symbol directory hierarchy.

   The first line of the generated libfoo.so.sym will have a "MODULE"
   entry that carries a hexadecimal version number, e.g.:

     MODULE Linux arm D51B4A5504974FA6ECC1869CAEE3603B0 test_google_breakpad

   Note: The second field could be either 'Linux' or 'Android'.

   Extract the version number, and a 'symbol' directory, for example:

      $PROJECT_PATH/symbols/libfoo.so/$VERSION/

   Copy/Move your libfoo.sym file there.

4/ Invoke minidump_stackwalk to create the stack trace:

     minidump_stackwalk $MINIDUMP_FILE $PROJECT_PATH/symbols

Note that various helper scripts can be found on the web to automate these
steps.

IV. Verifying the Android build library:
========================================

If you modify Google Breakpad and want to check that it still works correctly
on Android, please run the android/run-checks.sh script which will do all
necessary verifications for you. This includes:

  - Rebuilding the full host binaries.
  - Rebuilding the full Android binaries with configure/make.
  - Rebuilding the client library unit tests, and running them on a device.
  - Rebuilding the client library with ndk-build.
  - Building, installing and running a test crasher program on a device.
  - Extracting the corresponding minidump, dumping the test program symbols
    and generating a stack trace.
  - Checking the generated stack trace for valid source locations.

For more details, please run:

  android/run-checks.sh –help-all
google-breakpad的使用
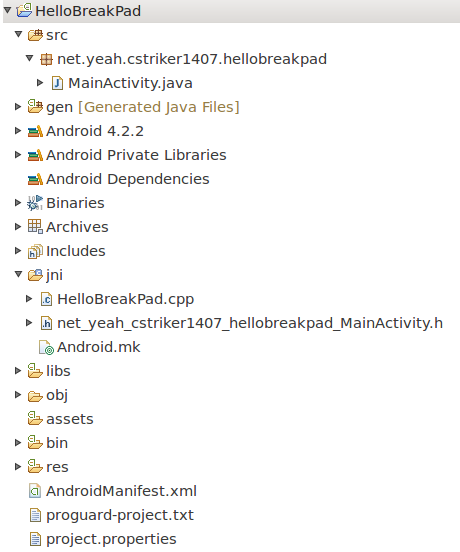
为了简单起见,我们先建立一个最简单的Android的JNI工程【 HelloBreakPad 】,如下图所示:
核心代码如下:
MainActivity.java:
public class MainActivity extends Activity
{
	static
	{
		try
		{
			System.loadLibrary("HelloBreakPad");
		}
		catch (Error e)
		{
			e.printStackTrace();
		}
	}

	private Button button1;
	private native int native_call();
	@Override
	protected void onCreate(Bundle savedInstanceState)
	{
		super.onCreate(savedInstanceState);
		setContentView(R.layout.activity_main);

		button1 = (Button)findViewById(R.id.button1);
		button1.setOnClickListener(new OnClickListener() {
			public void onClick(View v)
			{
				Toast.makeText(MainActivity.this,""+ native_call(), Toast.LENGTH_SHORT).show();
			}
		});
	}
}
net_yeah_cstriker1407_hellobreakpad_MainActivity.h:
/* DO NOT EDIT THIS FILE - it is machine generated */
#include <jni.h>
/* Header for class net_yeah_cstriker1407_hellobreakpad_MainActivity */

#ifndef _Included_net_yeah_cstriker1407_hellobreakpad_MainActivity
#define _Included_net_yeah_cstriker1407_hellobreakpad_MainActivity
#ifdef __cplusplus
extern "C" {
#endif
/*
 * Class:     net_yeah_cstriker1407_hellobreakpad_MainActivity
 * Method:    native_call
 * Signature: ()I
 */
JNIEXPORT jint JNICALL Java_net_yeah_cstriker1407_hellobreakpad_MainActivity_native_1call
  (JNIEnv *, jobject);

#ifdef __cplusplus
}
#endif
#endif
HelloBreakPad.cpp:
#include <jni.h>
#include <string.h>

#include "net_yeah_cstriker1407_hellobreakpad_MainActivity.h"
JNIEXPORT jint JNICALL Java_net_yeah_cstriker1407_hellobreakpad_MainActivity_native_1call
  (JNIEnv *env, jobject obj)

{
	return 1;
}
Android.mk:
LOCAL_PATH := $(call my-dir)

include $(CLEAR_VARS)

LOCAL_MODULE    := HelloBreakPad
LOCAL_SRC_FILES := HelloBreakPad.cpp

include $(BUILD_SHARED_LIBRARY)
一切正常的话,这个工程就可以运行起来。此时,我们在这个工程上加入google-breakpad:
1)将 google-breakpad 源代码里面的src文件夹拷贝到 HelloBreakPad 的jni目录下,将 google-breakpad-read-only/android/google_breakpad 下的【 android.mk 】文件拷贝到相同目录下,需要注意的是里面有些代码是冗余的,可以删除,这里为了简单起见,作者简单的全部拷贝过来。
2)修改 HelloBreakPad 的 jni/andorid.mk ,按照要求增加代码,最后如下:
MY_ROOT_PATH := $(call my-dir)

################# 编译breakpad ####################
include $(MY_ROOT_PATH)/googlebreakpad/Android.mk


LOCAL_PATH := $(MY_ROOT_PATH)
include $(CLEAR_VARS)

LOCAL_MODULE    := HelloBreakPad
LOCAL_SRC_FILES := HelloBreakPad.cpp

################# 链接breakpad ####################
LOCAL_STATIC_LIBRARIES += breakpad_client

include $(BUILD_SHARED_LIBRARY)
3)增加一个Application.mk 文件,内容如下:
APP_STL := stlport_static
修改后的工程目录如下图所示:
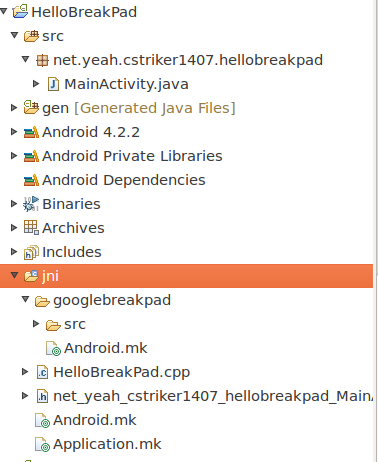
请注意,googlebreakpad文件夹和HelloBreakPad.cpp,Application.mk同一级别目录,src文件夹和Android.mk同一级别目录。
编译工程,如果正常的话会出现:
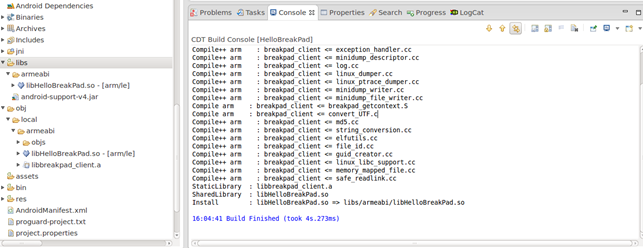
此时,google-breakpad的代码就合入了我们的工程,我们需要在自己的业务代码里使用它。
修改HelloBreakPad.cpp,增加文件处理,改后文件如下:
#include <jni.h>
#include <string.h>

#include "net_yeah_cstriker1407_hellobreakpad_MainActivity.h"

/* added to support googlebreakpad */
#include "googlebreakpad/src/client/linux/handler/exception_handler.h"
#include "googlebreakpad/src/client/linux/handler/minidump_descriptor.h"


JNIEXPORT jint JNICALL Java_net_yeah_cstriker1407_hellobreakpad_MainActivity_native_1call
  (JNIEnv *env, jobject obj)

{
	google_breakpad::MinidumpDescriptor descriptor("/mnt/sdcard/hellobreakpad");
	google_breakpad::ExceptionHandler eh(descriptor, NULL, NULL, NULL, true, -1);

	int *p = 0;
	*p = 1;//bug!!

	return 1;
}
注意:这里为了简单起见,将crash文件直接写到sd卡里面。而且代码里面有明显的bug~。
修改AndroidManifest.xml,增加sd卡写权限:
<uses-permission android:name="android.permission.MOUNT_UNMOUNT_FILESYSTEMS" />
<uses-permission android:name="android.permission.WRITE_EXTERNAL_STORAGE" />
在sd卡里面手动增加一个文件夹hellobreakpad,编译运行程序,点击按钮,会发现程序crash,然后sd卡里面出现了crash文件,如下图,将文件取出,保存好,如下图:

crash文件的处理
crash文件的处理有点麻烦,需要使用一些工具。因此这里我们还需要在ubuntu上编译google-breakpad。
最简单的google-breakpad的编译命令是:进入/google-breakpad-read-only目录,编译,先 ./configure 然后 make 即可。
但是作者在编译时遇到了automake1.14找不到的问题,作者的系统是 ubuntu14.10 x64,在作者系统里面没有这个工具,apt-get也获取不到,最后下载了automake1.14源码进行编译安装,下载地址:
【 https://launchpad.net/ubuntu/trusty/+source/automake-1.14/1:1.14-2ubuntu1/+files/automake-1.14_1.14.orig.tar.xz 】。
编译安装方法也很简单:./configure 然后 make 然后make install 即可。里面可能会需要root权限,sudo即可。
当我们对 google-breakpad-read-only make成功之后我们会在/google-breakpad-read-only/src/tools/linux/dump_syms下面找到可执行文件【 dump_syms 】,根据README.ANDROID文件的指导,我们把 HelloBreakPad工程/obj/local/armabi/下的libHelloBreakPad.so 取出来,执行命令:
./dump_syms libHelloBreakPad.so > libHelloBreakPad.so.sym
这里务必注意so取的是obj目录下的,不是libs目录下的。
使用head命令,获取verson:
head libHelloBreakPad.so.sym
会有大概如下输出:
MODULE Linux arm 37FD215018996EE5DCEA7C51DB89D1570 libHelloBreakPad.so
根据 README.ANDROID 的指引,我们将生成的 libHelloBreakPad.so.sym 文件放入文件夹:【 /HelloBreakPad/symbols/libHelloBreakPad.so/37FD215018996EE5DCEA7C51DB89D1570/ 】里面。
sym文件放好之后,进入google-breakpad-read-only/src/processor/目录,找到可执行文件minidump_stackwalk。为了简单,我将这个可执行文件和sd卡下面的crash文件全部放入symbols文件夹下面,如下图:

执行命令:
./minidump_stackwalk 089db057-1c2c-94d0-68f468a8-02dfa8d2.dmp ./ > result.txt
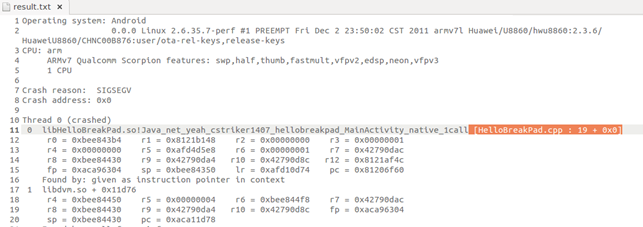
我们打开result.txt文件,就可以发现异常出现在:HelloBreakad.cpp的第19行。如下图:
发表评论