最近想用menu来做一些好玩的东西,就备忘下android的menu的各种用法。
菜单是用户界面中最常见的元素,使用也非常频繁,在Android中,菜单被分为如下三种,
选项菜单(OptionsMenu)、上下文菜单(ContextMenu)和子菜单(SubMenu)。
CONTENTS
OptionsMenu
1)通过xml文件来实现
XML文件如下
menu的XML文件的定义可以参考【 http://www.cnblogs.com/xirihanlin/archive/2010/06/25/1765261.html 】
<menu xmlns:android="http://schemas.android.com/apk/res/android" >
    <item
        android:id="@+id/action_settings"
        android:orderInCategory="100"
        android:showAsAction="never"
        android:title="@string/action_settings"/>
<item android:id="@+id/item1" android:title="a" android:icon="@drawable/weather10"/>
<item android:id="@+id/item2" android:title="b"/>
<item android:id="@+id/item3" android:title="c"/>
<item android:id="@+id/item4" android:title="d"/>
<item android:id="@+id/item5" android:title="e"/>
<item android:id="@+id/item6" android:title="f"/>
<item android:id="@+id/item7" android:title="g"/>
</menu>
Activity代码:
@Override
public boolean onCreateOptionsMenu(Menu menu)
{
	getMenuInflater().inflate(R.menu.main, menu);
	return true;//返回true会让菜单显示,false不会让菜单显示
}
@Override
public boolean onOptionsItemSelected(MenuItem item)
{
	if (item.getItemId() == R.id.item1)
	{
		Toast.makeText(this, item.getTitle(), Toast.LENGTH_SHORT).show();
	}
	return super.onOptionsItemSelected(item);
}
public void onClick(View v)
{
	openOptionsMenu();//可以通过该方法让菜单显示
}
备注:
1)menu是可以通过 android:orderInCategory 设置顺序的,越小越靠前。
2)menu的icon只有在第一级别menu上才会显示(第1-5个menu),点击更多出现的menuitem不会显示icon。
2)通过代码实现
Activity代码
@Override
public boolean onCreateOptionsMenu(Menu menu)
{
	menu.add(Menu.NONE, 1, Menu.NONE, "t1").setIcon(android.R.drawable.ic_menu_edit);
	menu.add(Menu.NONE, 2, Menu.NONE, "t2").setIcon(R.drawable.weather6);
	menu.add(Menu.NONE, 3, Menu.NONE, "t3");
	menu.add(Menu.NONE, 4, Menu.NONE, "t4");
	menu.add(Menu.NONE, 5, Menu.NONE, "t5");
	return true;
}
备注:
1)以android.R开头的资源是系统提供的,我们自己提供的资源是以R开头的
参考【 http://www.cnblogs.com/salam/archive/2011/04/04/2005329.html 】
核心思想是通过在一个gridview上面添加item的方式,使用dialog仿制出一个menu的样式。
1)建立一个gridview,用来作为menu的主layout(menugrid.xml)
<?xml version="1.0" encoding="utf-8"?>
<LinearLayout xmlns:android="http://schemas.android.com/apk/res/android"
    android:layout_width="fill_parent"
    android:layout_height="fill_parent"
    android:orientation="vertical" >
    <GridView
        android:id="@+id/gridview"
        android:layout_width="fill_parent"
        android:layout_height="fill_parent"
        android:gravity="center"
        android:horizontalSpacing="10dip"
        android:numColumns="4"
        android:stretchMode="columnWidth"
        android:verticalSpacing="10dip" />
</LinearLayout>
2)建立一个自定自定义的layout,用来作为每个item的样式(menuitem.xml)
<?xml version="1.0" encoding="utf-8"?>
<RelativeLayout xmlns:android="http://schemas.android.com/apk/res/android"
    android:id="@+id/RelativeLayout_Item"
    android:layout_width="fill_parent"
    android:layout_height="wrap_content"
    android:paddingBottom="5dip" >

    <ImageView
        android:id="@+id/item_image"
        android:layout_width="wrap_content"
        android:layout_height="wrap_content"
        android:layout_centerHorizontal="true" >
    </ImageView>

    <TextView
        android:id="@+id/item_text"
        android:layout_width="wrap_content"
        android:layout_height="wrap_content"
        android:layout_below="@id/item_image"
        android:layout_centerHorizontal="true"
        android:text="选项" >
    </TextView>
</RelativeLayout>
3)在Activity中声明相关的变量
	private boolean secondPage = false;// menu菜单翻页控制
	private AlertDialog menuDialog;// menu菜单Dialog
	private GridView menuGrid;
	private View menuView;

int[] menu_image_array1 = { R.drawable.weather1, R.drawable.weather2,
		R.drawable.weather3, R.drawable.weather4, R.drawable.weather5,
		R.drawable.weather6, R.drawable.weather7, R.drawable.weather8, };
String[] menu_name_array1 = { "weather1", "weather2", "weather3",
		"weather4", "weather5", "weather6", "weather7", "more", };
int[] menu_image_array2 = { R.drawable.weather9, R.drawable.weather10,
		R.drawable.ic_launcher, };
String[] menu_name_array2 = { "weather9", "back", "quit" };
4)建立一个dialog,将自定义的gridview贴到上面
@Override
protected void onCreate(Bundle savedInstanceState) {
	super.onCreate(savedInstanceState);
	setContentView(R.layout.activity_main);
	button1 = (Button) findViewById(R.id.button1);
	button1.setOnClickListener(new OnClickListener() {
		public void onClick(View v) {
			openOptionsMenu();
		}
	});

	menuView = View.inflate(this, R.layout.menugrid, null);
	// 创建AlertDialog
	menuDialog = new AlertDialog.Builder(this).create();
	menuDialog.setView(menuView);
	menuDialog.setOnKeyListener(new OnKeyListener() {
		public boolean onKey(DialogInterface dialog, int keyCode,
				KeyEvent event) {
			if (keyCode == KeyEvent.KEYCODE_MENU)// 监听按键
				dialog.dismiss();
			return false;
		}
	});

	menuGrid = (GridView) menuView.findViewById(R.id.gridview);
	menuGrid.setAdapter(getMenuAdapter(menu_name_array1, menu_image_array1));
	menuGrid.setOnItemClickListener(new OnItemClickListener() {
		public void onItemClick(AdapterView<?> arg0, View item, int arg2,
				long arg3)
		{
			//arg2标识item在view中的顺序,以0开始。
			switch (arg2)
			{
				case 7:// more
				{
					if (!secondPage) {
						menuGrid.setAdapter(getMenuAdapter(menu_name_array2,
								menu_image_array2));
						secondPage = true;
					}
					break;
				}
				case 1:// back
					if (secondPage) {
						menuGrid.setAdapter(getMenuAdapter(menu_name_array1,
								menu_image_array1));
						secondPage = false;
					}
					break;
				case 2:// quit
				{
					if (secondPage)
					{
						menuDialog.dismiss();
						break;
					}
				}
				default:
				{

				}
			}
		}
	});
}
private SimpleAdapter getMenuAdapter(String[] menuNameArray,
		int[] imageResourceArray) {
	ArrayList> data = new ArrayList>();
	for (int i = 0; i < menuNameArray.length; i++) {
		HashMap map = new HashMap();
		map.put("itemImage", imageResourceArray[i]);
		map.put("itemText", menuNameArray[i]);
		data.add(map);
	}
	SimpleAdapter simperAdapter = new SimpleAdapter(this, data,
			R.layout.menuitem, new String[] { "itemImage", "itemText" },
			new int[] { R.id.item_image, R.id.item_text });
	return simperAdapter;
}
代码比较复杂,但是主要是onclick的消息比较长,去掉item的处理之后,就很短了。
5)activity回调函数的处理,比较特殊一点
@Override
public boolean onCreateOptionsMenu(Menu menu) {
	menu.add(Menu.NONE, 5, Menu.NONE, "t5");
	return true;
}
@Override
public boolean onMenuOpened(int featureId, Menu menu) {
	menuDialog.show();
	return false;// 返回为true 则显示系统menu
}
示例:
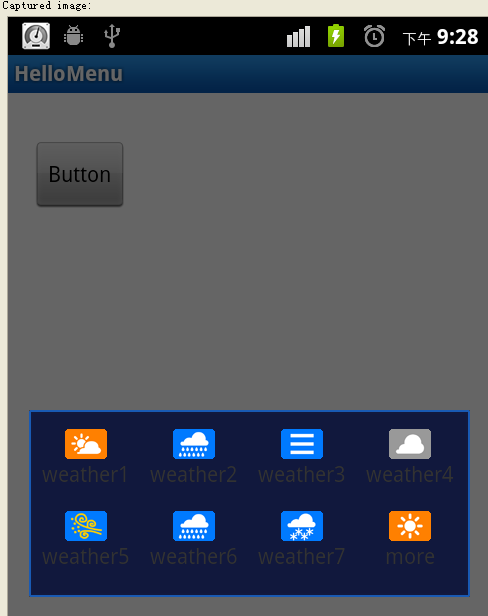
备注:
1)如果直接调用openOptionsMenu(),也可以在onCreateOptionsMenu()返回为false的情况下弹出dialog,但是此情形下点击menu会出现dialog一闪而退的情况。具体的逻辑没有查过,但是我感觉一般不会这么用。
4)自定义系统菜单的背景
【 http://blog.csdn.net/sodino/article/details/6165132 】我没有使用过,先备忘下。
5)添加子菜单
添加子菜单比较和添加菜单项比较相似。
@Override
public boolean onCreateOptionsMenu(Menu menu) {
	SubMenu sm = menu.addSubMenu("submenu").setIcon(R.drawable.weather1);
	sm.add(Menu.NONE, 1, Menu.NONE,"t1").setIcon(android.R.drawable.ic_menu_edit);
	 menu.add(Menu.NONE, 2, Menu.NONE, "t2").setIcon(R.drawable.weather6);
	 sm.add(Menu.NONE, 3, Menu.NONE, "t3");
	 menu.add(Menu.NONE, 4, Menu.NONE, "t4");
	 menu.add(Menu.NONE, 5, Menu.NONE, "t5");
	return true;
}
ContextMenu
1)通过代码实现
public class MainActivity extends Activity {
	private TextView textView1;

	protected void onCreate(Bundle savedInstanceState) {
		super.onCreate(savedInstanceState);
		setContentView(R.layout.activity_main);

		textView1 = (TextView)findViewById(R.id.textView1);
		registerForContextMenu(textView1);
@Override
 public void onCreateContextMenu(ContextMenu menu, View v,
 ContextMenuInfo menuInfo)
 {
 if (v.getId() == R.id.textView1)
 {
 menu.setHeaderIcon(R.drawable.weather7);
 menu.setHeaderTitle("这是一个ContextMenu");

 SubMenu sm = menu.addSubMenu("submenu");
 sm.add(Menu.NONE, 4, Menu.NONE, "t4");

 menu.add(3, 200, 200, "Context Menu 1").setIcon(R.drawable.weather2);
 menu.add(3, 201, 201, "Context Menu 2");
 }

 super.onCreateContextMenu(menu, v, menuInfo);
 }

 @Override
 public boolean onContextItemSelected(MenuItem item)
 {
 if (item.getItemId() == 200)
 {
 Toast.makeText(this, item.getTitle(), Toast.LENGTH_SHORT).show();
 }
 return super.onContextItemSelected(item);
 }
 @Override
 public void onContextMenuClosed(Menu menu)
 {
 super.onContextMenuClosed(menu);
 }
发表评论