我们可以使用glScissor来对界面进行矩形裁剪,这里备份下最简单的代码。
CONTENTS
glScissor的介绍:
转自【 http://blog.csdn.net/wlsgzl/article/details/12946241 】,有删改。
glScissor — define the scissor box. 定义裁剪窗口
C Specification C风格描述
void glScissor(GLint x, GLint y, GLsizei width, GLsizei height);
Parameters 参数
x,y
Specify the lower left corner of the scissor box.Initially (0, 0).指定裁剪窗口的左下角,初始值为(0,0)。
width, height
Specify the width and height of the scissor box.When a GL context is first attached to a window,width and height are set to the dimensions of that window.
指定裁剪窗口的宽和高。当一个GL上下文第一次关联到窗口时,会使用width和height作为窗口的尺寸。
Description 描述
glScissor defines a rectangle, called the scissor box,in window coordinates.The first two arguments,x and y,specify the lower left corner of the box.width and height specify the width and height of the box. glScissor在窗口坐标定义了一个称为裁剪窗口的矩形区域。前两个参数x、y指定了裁剪窗口的左下角。width和height指定了窗口的宽和高。
To enable and disable the scissor test, call glEnable and glDisable with argument GL_SCISSOR_TEST. The test is initially disabled.While the test is enabled, only pixels that lie within the scissor box can be modified by drawing commands.Window coordinates have integer values at the shared corners of frame buffer pixels.glScissor(0,0,1,1) allows modification of only the lower left pixel in the window, and glScissor(0,0,0,0) doesn’t allow modification of any pixels in the window.
通过glEnable和glDisable函数并使用GL_SCISSOR_TEST参数来启用或者禁用裁剪测试。裁剪测试初始时是不可用的。当裁剪测试启用后,只有在裁剪窗口中的像素才是可以被绘制函数修改的。窗口坐标在帧缓冲区像素的共享角里使用整数值(好吧,我水平有限……)。glScissor(0,0,1,1)只允许修改窗口左下角的像素,glScissor(0,0,0,0)不允许修改窗口中的任何像素。
When the scissor test is disabled,it is as though the scissor box includes the entire window.
如果裁剪测试没有启用,就可以当作裁剪窗口是整个窗口区域。
通过这段话我们知道,glScissor是默认没有启用的,这时opengl会绘制整个窗口区域,如果我们要进行裁剪,那么只需要enable,然后将需要保留的矩形坐标传入即可。不过这里需要注意的是矩形坐标是指opengl坐标系,即以屏幕左下角为基准点的坐标系。
测试代码:
由于需要调用opengl命令,那么就需要重写CCNode的 draw 或者 visit 方法。这里我们需要重写 visit 方法,原因是:
1)glScissor可以进行开关控制,而且使用完之后必须关闭,否则整个opengl的上下文都受到影响。
2)考虑到CCNode可能会有子节点,一般来讲,子节点也需要被裁剪。
根据CCNode的代码我们可以发现,visit 方法遍历调用的CCNode的子节点的visit方法,然后才调用了 draw 方法。
//CCNode的visit代码
void CCNode::visit()
{
。。。。。
。。。。。
    if(m_pChildren && m_pChildren->count() > 0)
    {
        sortAllChildren();
        // draw children zOrder < 0
        ccArray *arrayData = m_pChildren->data;
        for( ; i < arrayData->num; i++ )
        {
            pNode = (CCNode*) arrayData->arr[i];

            if ( pNode && pNode->m_nZOrder < 0 )
            {
                pNode->visit();
            }
            else
            {
                break;
            }
        }
        // self draw
        this->draw();

        for( ; i < arrayData->num; i++ )
        {
            pNode = (CCNode*) arrayData->arr[i];
            if (pNode)
            {
                pNode->visit();
            }
        }
    }
    else
    {
        this->draw();
    }
。。。。。
。。。。。
}
为了对比,这里我们实现一个最简单的功能。首先继承CCSprite,代码如下:
MySprite.h:
#ifndef __MY_SPRITE_H__
#define __MY_SPRITE_H__

#include "cocos2d.h"

class MySprite :public cocos2d::CCSprite
{
public:
    static MySprite* create(const char *pszFileName);

    virtual void visit(void);
};

#endif // __MY_SPRITE_H__
MySprite.cpp:
#include "MySprite.h"
using namespace cocos2d;

void MySprite::visit( void )
{
	glEnable(GL_SCISSOR_TEST);

	float scale = 1.0f;

#if (CC_TARGET_PLATFORM == CC_PLATFORM_WIN32)
	scale = CCEGLView::sharedOpenGLView()->getFrameZoomFactor();
	//  float   scaleX = CCEGLView::sharedOpenGLView()->getScaleX();
	//	float   scaleY = CCEGLView::sharedOpenGLView()->getScaleY();
#endif
//由于该Sprite直接放在顶层layer上,因此opengl坐标系就是自己的坐标
	CCPoint worldPos = this->getPosition();
	glScissor(worldPos.x, worldPos.y, scale * this->getContentSize().width/2, scale * this->getContentSize().height/2);

	CCSprite::visit();

	glDisable(GL_SCISSOR_TEST);
}

MySprite* MySprite::create( const char *pszFileName )
{
	MySprite *pobSprite = new MySprite();
	if (pobSprite && pobSprite->initWithFile(pszFileName))
	{
		pobSprite->autorelease();
		return pobSprite;
	}
	CC_SAFE_DELETE(pobSprite);
	return NULL;
}
对比代码:
	CCSprite *spriteA = CCSprite::create("center.png");
	MySprite *spriteB = MySprite::create("center.png");

	spriteA->setPosition(ccp(visibleSize.width/2, visibleSize.height/2));
	spriteB->setPosition(ccp(visibleSize.width/2 + 200, visibleSize.height/2));
	spriteA->setAnchorPoint(ccp(0,0));
	spriteB->setAnchorPoint(ccp(0,0));

	this->addChild(spriteA);
	this->addChild(spriteB);
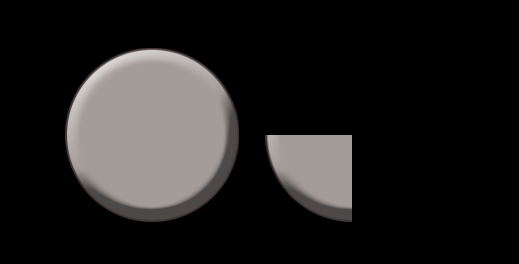
对比图像:
很明显,右边图像只有左下角还有,其他的都被切掉了。
发表评论