废话不多扯了。
CONTENTS
文档
pyqt5文档【 http://pyqt.sourceforge.net/Docs/PyQt5/ 】
PyQt5安装方法
新版本的python中集成了pip工具,直接使用pip安装即可。
D:\code\QT>pip install pyqt5
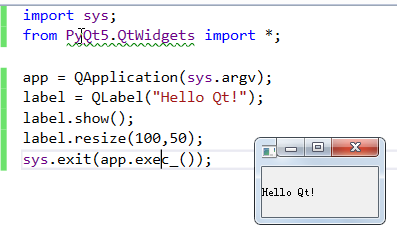
PyQt5下代码实现HelloWorld
import sys;
from PyQt5.QtWidgets import *;

app = QApplication(sys.argv);
label = QLabel("Hello Qt!");
label.show();
label.resize(100,50);
sys.exit(app.exec_());
执行如下图:
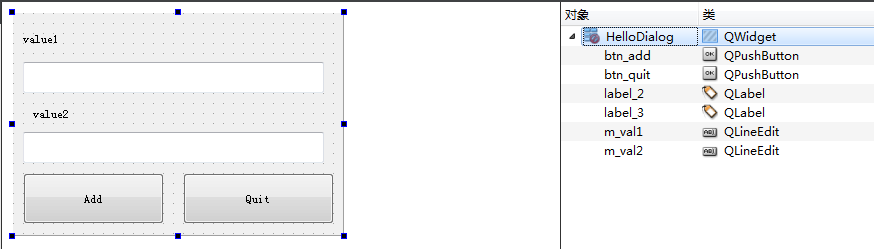
PyQt5使用ui文件
Qt的一大优势就是QtDesigner,这里新建一个ui文件,HelloDialog.ui
<?xml version="1.0" encoding="UTF-8"?>
<ui version="4.0">
 <class>HelloDialog</class>
 <widget class="QWidget" name="HelloDialog">
  <property name="geometry">
   <rect>
    <x>0</x>
    <y>0</y>
    <width>330</width>
    <height>222</height>
   </rect>
  </property>
  <property name="windowTitle">
   <string>Form</string>
  </property>
  <widget class="QPushButton" name="btn_add">
   <property name="geometry">
    <rect>
     <x>10</x>
     <y>160</y>
     <width>141</width>
     <height>51</height>
    </rect>
   </property>
   <property name="text">
    <string>Add</string>
   </property>
  </widget>
  <widget class="QPushButton" name="btn_quit">
   <property name="geometry">
    <rect>
     <x>170</x>
     <y>160</y>
     <width>151</width>
     <height>51</height>
    </rect>
   </property>
   <property name="text">
    <string>Quit</string>
   </property>
  </widget>
  <widget class="QLineEdit" name="m_val1">
   <property name="geometry">
    <rect>
     <x>10</x>
     <y>49</y>
     <width>301</width>
     <height>31</height>
    </rect>
   </property>
  </widget>
  <widget class="QLineEdit" name="m_val2">
   <property name="geometry">
    <rect>
     <x>10</x>
     <y>119</y>
     <width>301</width>
     <height>31</height>
    </rect>
   </property>
  </widget>
  <widget class="QLabel" name="label_2">
   <property name="geometry">
    <rect>
     <x>10</x>
     <y>10</y>
     <width>91</width>
     <height>31</height>
    </rect>
   </property>
   <property name="text">
    <string>value1</string>
   </property>
  </widget>
  <widget class="QLabel" name="label_3">
   <property name="geometry">
    <rect>
     <x>20</x>
     <y>90</y>
     <width>91</width>
     <height>21</height>
    </rect>
   </property>
   <property name="text">
    <string>value2</string>
   </property>
  </widget>
 </widget>
 <resources/>
 <connections/>
</ui>
如下图:
关于如何使用ui文件,官方介绍了2种方式,【 http://pyqt.sourceforge.net/Docs/PyQt5/designer.html 】
通过代码直接调用ui文件
代码如下:
import sys;
from PyQt5.QtWidgets import *;
from PyQt5 import uic;

app = QApplication(sys.argv);
hellodialog = uic.loadUi("HelloDialog.ui");#这里ui文件和python文件放在同一目录
hellodialog.show();
sys.exit(app.exec_());
如果上面的代码不好理解,可以看下下面的代码
import sys;
from PyQt5.QtWidgets import *;
from PyQt5 import uic;

app = QApplication(sys.argv);
#hellodialog = uic.loadUi("HelloDialog.ui");#这里ui文件和python文件放在同一目录
#hellodialog.show();

UI_MainDlg, UI_BaseClass = uic.loadUiType("HelloDialog.ui");
ui_basecls = UI_BaseClass();
ui_dlg = UI_MainDlg();

ui_dlg.setupUi(ui_basecls);
ui_basecls.show();

sys.exit(app.exec_());
执行如下图:

使用pyuic5工具来解析ui文件
首先使用pyuic5工具将ui文件生成为python文件;
D:\code\QT>pyuic5 HelloDialog.ui -x -o HelloDialog.py
这里可以关注下pyuic5的几个有意思的参数,-x -p 等等。
生成的HelloDialog.py如下:
# -*- coding: utf-8 -*-

# Form implementation generated from reading ui file 'HelloDialog.ui'
#
# Created by: PyQt5 UI code generator 5.7
#
# WARNING! All changes made in this file will be lost!

from PyQt5 import QtCore, QtGui, QtWidgets

class Ui_HelloDialog(object):
    def setupUi(self, HelloDialog):
        HelloDialog.setObjectName("HelloDialog")
        HelloDialog.resize(330, 222)
        self.btn_add = QtWidgets.QPushButton(HelloDialog)
        self.btn_add.setGeometry(QtCore.QRect(10, 160, 141, 51))
        self.btn_add.setObjectName("btn_add")
        self.btn_quit = QtWidgets.QPushButton(HelloDialog)
        self.btn_quit.setGeometry(QtCore.QRect(170, 160, 151, 51))
        self.btn_quit.setObjectName("btn_quit")
        self.m_val1 = QtWidgets.QLineEdit(HelloDialog)
        self.m_val1.setGeometry(QtCore.QRect(10, 49, 301, 31))
        self.m_val1.setObjectName("m_val1")
        self.m_val2 = QtWidgets.QLineEdit(HelloDialog)
        self.m_val2.setGeometry(QtCore.QRect(10, 119, 301, 31))
        self.m_val2.setObjectName("m_val2")
        self.label_2 = QtWidgets.QLabel(HelloDialog)
        self.label_2.setGeometry(QtCore.QRect(10, 10, 91, 31))
        self.label_2.setObjectName("label_2")
        self.label_3 = QtWidgets.QLabel(HelloDialog)
        self.label_3.setGeometry(QtCore.QRect(20, 90, 91, 21))
        self.label_3.setObjectName("label_3")

        self.retranslateUi(HelloDialog)
        QtCore.QMetaObject.connectSlotsByName(HelloDialog)

    def retranslateUi(self, HelloDialog):
        _translate = QtCore.QCoreApplication.translate
        HelloDialog.setWindowTitle(_translate("HelloDialog", "Form"))
        self.btn_add.setText(_translate("HelloDialog", "Add"))
        self.btn_quit.setText(_translate("HelloDialog", "Quit"))
        self.label_2.setText(_translate("HelloDialog", "value1"))
        self.label_3.setText(_translate("HelloDialog", "value2"))


if __name__ == "__main__":
    import sys
    app = QtWidgets.QApplication(sys.argv)
    HelloDialog = QtWidgets.QWidget()
    ui = Ui_HelloDialog()
    ui.setupUi(HelloDialog)
    HelloDialog.show()
    sys.exit(app.exec_())
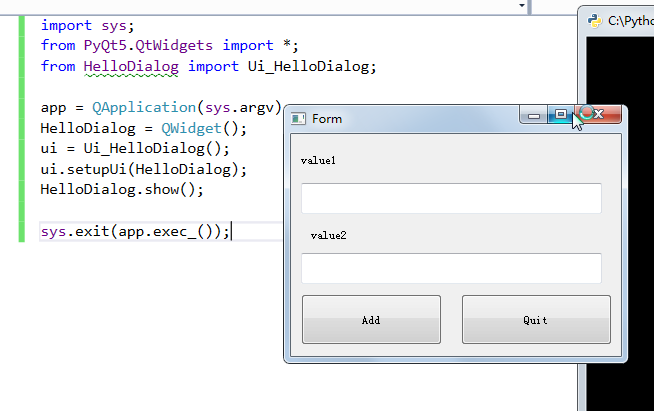
那么如何使用呢,其实HelloDialog.py最下边已经告诉我们了,最简单代码如下:
import sys;
from PyQt5.QtWidgets import *;
from HelloDialog import Ui_HelloDialog;

app = QApplication(sys.argv);
HelloDialog = QWidget();
ui = Ui_HelloDialog();
ui.setupUi(HelloDialog);
HelloDialog.show();

sys.exit(app.exec_());
运行如下图:
从两种运行方式可以看出,直接使用ui文件和先使用pyuic5工具本质上是一致的。
那么如何写一个可以使用的UI呢,这里作者以pyuic5工具为基础,代码如下:
import sys;
from PyQt5.QtWidgets import *;
from HelloDialog import Ui_HelloDialog;

class MyHelloDialg(Ui_HelloDialog, QDialog):
    def __init__(self):
        super(MyHelloDialg, self).__init__();
        self.setupUi(self);
        self.setdlgAttr();

    def setdlgAttr(self):
        self.btn_add.clicked.connect(self.onbtn_add_clicked);
        self.btn_quit.clicked.connect(self.accept);

    def onbtn_add_clicked(self):
        int1 = int(self.m_val1.text());
        int2 = int(self.m_val2.text());
        int3 = int1 + int2;
        QMessageBox.information(self,"Result","%d + %d = %d"%(int1, int2, int3),QMessageBox.Ok);
        pass;

    def onbtn_quit_clicked(self):
        pass;


app = QApplication(sys.argv);
myhellodlg = MyHelloDialg();
myhellodlg.show();
sys.exit(app.exec_());
结果如下图:

发表评论